An introduction to the Breville Zero Retention Single Dose Hopper
Get one for yourself here: https://www.etsy.com/uk/listing/945070338/brevillesage-grinder-single-dosing-zero
Upgrade your Breville Grinder to get results close to a Niche Zero or Ceado Hero with this Commercial Coffee Grinder Bellow and Sindle Dose Hopper! Grind 20g and expect all 20g out! Get class leading low retention for your grinder! For subsequent grinds you can expect less that 0.1g difference between grinds.
The precision design ensures there is no free space for grinds to collect and get stale. Together with the optional bellow, it helps to clear the chute of even more remainder grinds giving you very low retention. It also helps clear stale grinds left from day before so your shots are much more consistent.
This is a plug and play replacement for the original hopper. Just put in and turn the control ring till you feel it touching the outer burr and you are ready for near zero retention single dosing!
The adapter is 3D printed with PLA while the commercial coffee bellow is imported and similar to the one used on the Ceado. It's purpose made for coffee grinders with high quality rubber, NOT 3d printed thus will take hundred of thousands of pumping. It also comes with a heavy metal plate cover for a touch of class?
Here is how tough the bellow is, it can double up as your very own stress squeeze ball if you need it to!
It supports all Breville grinders, built in and standalone, including the
- Breville Barista Express BES870,
- Breville Barista Touch BES880,
- Breville Barista Pro BES878,
- Breville Oracle BES980,
- Breville Oracle Touch BES990,
- Breville Smart Grinder Pro
How to use the Breville Zero Retention Single Dose Hopper
Using the Breville Zero Retention Single Dose Hopper to get near zero shot to shot variance is simple
- Open up the cover on the bellow
- Pour your beans in to the single dose hopper
- Replace the bellow
- Set your grinder to maximum time and start grinding
- Once the beans are fully ground, give the bellow a few pumps while the grinder is still on
- Turn off your grinder and brew!
How to install your Breville Single Dose Hopper
First deep clean your grinder.

(1) Align pins with the inner switch
(2) Make sure pin face down

(3) Push down all the way
(4) Push the pins back in, if fitted proper it should go in, especially the one facing front which is without the spring switch. The one facing the back has a spring in the switch but it will be activated when you screw in the hopper.

(5) Place the hopper in and just turn to screw it in. You will notice the grinder warning to lock the hopper dissapear when you screw it in as the pins trigger the safety switches.

(6) Lightly turn the hopper until you feel resistance when it touches the outer burr, then turn back a little. This is to ensure it doesn't put pressure on the burr. Just enough to prevent grinds escaping the chamber.

TIP: Before adjusting your grind.. Always remember to unscrew the Single dose hopper first. Adjust the grind settings then screw back the hopper, else you might get too much space between hopper or too little that it puts pressure on the burr.
How to remove the Breville Single Doser Hopper to clean burrs
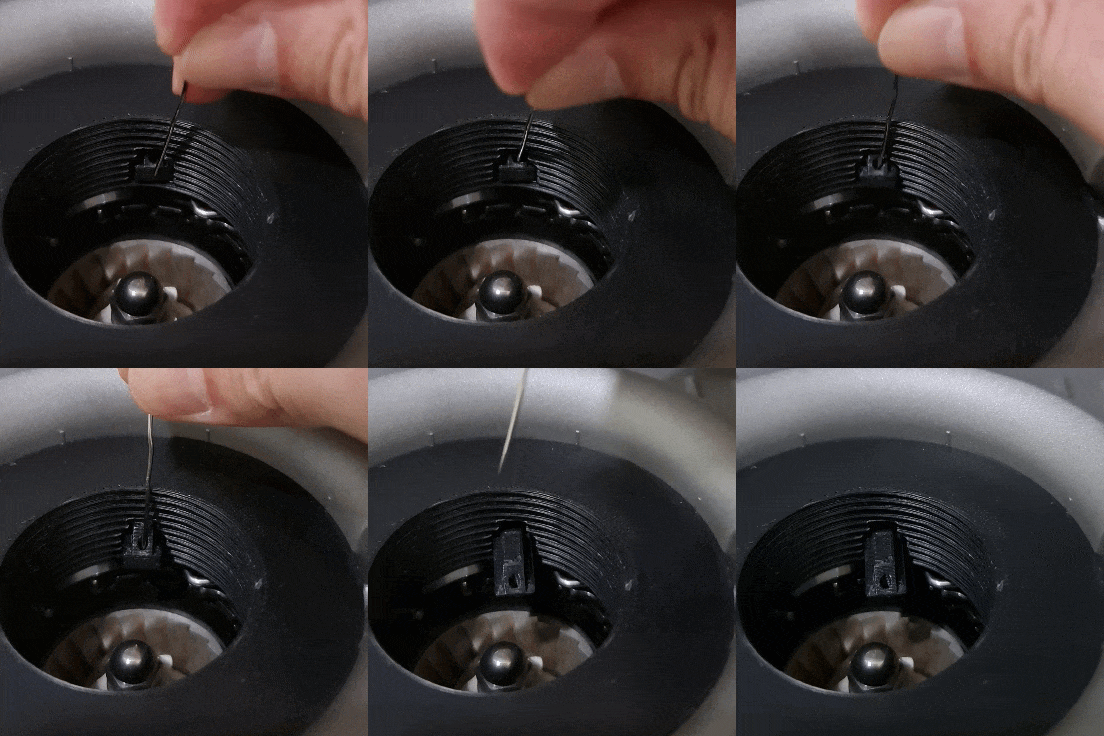
To remove the hopper for cleaning, unscrew the hopper then use a paper clip and (1) poke the little hole in the pin and simply pull it out (2). You can then remove the ring.

A quick animation demonstrating how to remove the switch trigger pins.

TIP: You can easily clean without removing the ring by just sticking your vacuum cleaner into the chamber. Watch out you don't vacuum up the pins also else your grinder can't turn on.

